Picture this: you're lying on your couch, sipping your favorite drink, and suddenly you realize you need to adjust the thermostat, turn off a light, or lock your front door. With a Raspberry Pi remote control IoT app, all of that becomes possible with just a few taps on your phone. It's not magic—it's technology! Whether you're a tech enthusiast or just someone looking to upgrade their home, this guide will walk you through everything you need to know about turning your Raspberry Pi into a powerhouse for smart home automation.
Nowadays, the world is all about connectivity, and the Internet of Things (IoT) has become the backbone of modern living. But what if you could take control of your IoT devices without spending a fortune on expensive smart home systems? Enter Raspberry Pi, the little computer that can do big things. By creating a Raspberry Pi remote control IoT app, you can manage your devices effortlessly, making your life easier and more convenient.
This isn't just a guide; it's your roadmap to mastering Raspberry Pi for IoT applications. From setting up the hardware to coding your app, we'll cover everything step-by-step. So, grab your Raspberry Pi, a cup of coffee, and let's dive into the world of remote-controlled IoT magic!
Read also:Dream High Korean Drama A Journey Of Dreams And Aspirations
Table of Contents
- Introduction to Raspberry Pi IoT
- Raspberry Pi Basics
- Overview of IoT Apps
- Hardware Setup for Raspberry Pi
- Software Setup and Configuration
- Coding Your Raspberry Pi Remote Control IoT App
- Testing and Debugging Your App
- Security Considerations for IoT Apps
- Expanding Your IoT System
- Conclusion and Next Steps
Introduction to Raspberry Pi IoT
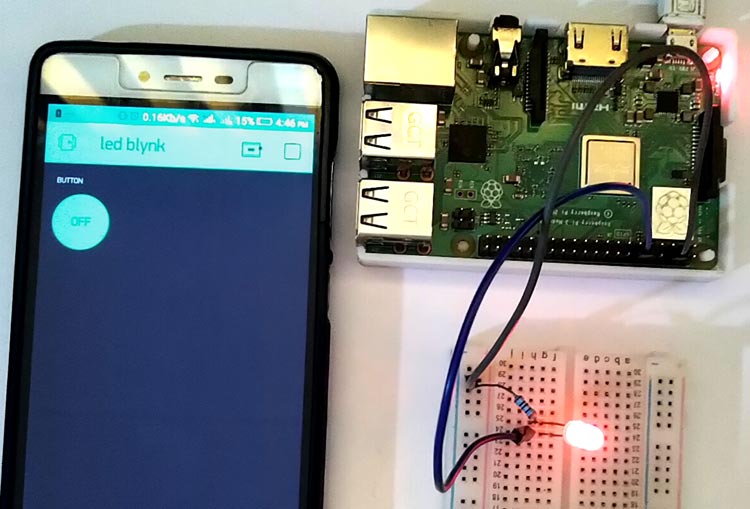
So, what exactly is this Raspberry Pi remote control IoT app thing all about? Well, think of it as a bridge between your devices and your smartphone. The Raspberry Pi acts as the brain, while the IoT app serves as the remote control, allowing you to manage everything from your phone or tablet. This setup is not only cost-effective but also highly customizable, making it perfect for DIY enthusiasts and tech-savvy individuals alike.
Why Raspberry Pi?
The Raspberry Pi is more than just a tiny computer. It's a versatile tool that can handle a wide range of tasks, from running media centers to controlling home automation systems. Its affordability and open-source nature make it an ideal choice for building IoT applications. Plus, the community support around Raspberry Pi is massive, meaning you'll never run out of resources or help when you need it.
Raspberry Pi Basics
Before we dive into creating your Raspberry Pi remote control IoT app, let's take a moment to understand the basics of the Raspberry Pi. This little device has been around since 2012 and has evolved into several versions, each with its own set of features. Whether you're using a Raspberry Pi 4 or an older model, the principles remain the same.
Key Features of Raspberry Pi
- Compact size
- Low power consumption
- Multiple GPIO pins for connecting peripherals
- Support for various operating systems
These features make the Raspberry Pi an excellent platform for developing IoT applications. Its ability to connect to a wide range of sensors and actuators means you can control almost anything in your home or office.
Overview of IoT Apps
An IoT app is essentially a software application that allows you to interact with IoT devices. In the context of Raspberry Pi, this means creating an app that communicates with your Raspberry Pi to control connected devices. The app can be as simple as a button to turn on a light or as complex as a dashboard showing real-time data from multiple sensors.
Benefits of Using IoT Apps
- Remote control of devices
- Real-time monitoring
- Automation of repetitive tasks
- Improved energy efficiency
By leveraging the power of IoT apps, you can transform your Raspberry Pi into a central hub for all your smart home needs. Whether you're controlling lights, managing security systems, or monitoring environmental conditions, the possibilities are endless.
Read also:Is Kirk Franklin Married Exploring The Life And Love Story Of The Gospel Legend
Hardware Setup for Raspberry Pi
Now that you understand the basics, let's talk about the hardware setup for your Raspberry Pi remote control IoT app. This step is crucial, as it lays the foundation for everything else. You'll need a few essential components to get started.
Essential Components
- Raspberry Pi (any model)
- MicroSD card with pre-installed operating system
- Power supply
- Wi-Fi dongle (if not built-in)
- Sensors and actuators
Once you have all the components, it's time to assemble your Raspberry Pi. Connect the power supply, insert the microSD card, and attach any additional peripherals like sensors or actuators. Make sure everything is securely connected before moving on to the software setup.
Software Setup and Configuration
With the hardware in place, it's time to set up the software. The first step is to choose an operating system for your Raspberry Pi. While there are several options available, Raspbian is the most popular choice due to its ease of use and extensive support.
Installing the Operating System
Follow these steps to install the operating system on your Raspberry Pi:
- Download the Raspbian image from the official website.
- Use a tool like Etcher to write the image to your microSD card.
- Insert the microSD card into your Raspberry Pi and power it on.
Once the operating system is installed, you can configure your Raspberry Pi by setting up Wi-Fi, enabling SSH, and updating the software. This will ensure your device is ready for app development.
Coding Your Raspberry Pi Remote Control IoT App
Now comes the fun part: coding your app. There are several programming languages you can use to develop your Raspberry Pi remote control IoT app, but Python is often the go-to choice due to its simplicity and wide range of libraries.
Steps to Code Your App
- Set up a development environment on your Raspberry Pi.
- Install necessary libraries for interacting with GPIO pins and networking.
- Write the code to control your devices.
- Test the app locally before deploying it.
Remember, the key to a successful app is to keep it simple and user-friendly. Focus on creating a clean interface that allows users to easily control their devices without unnecessary complexity.
Testing and Debugging Your App
Testing and debugging are critical steps in the app development process. Before deploying your Raspberry Pi remote control IoT app, make sure it works flawlessly. This involves testing each feature individually and identifying any bugs or issues.
Best Practices for Testing
- Test the app in different scenarios to ensure reliability.
- Monitor performance and optimize code for efficiency.
- Seek feedback from users to improve functionality.
Debugging can be challenging, but tools like Python's logging module can help you identify and fix issues quickly. Don't be afraid to ask for help from the Raspberry Pi community if you get stuck.
Security Considerations for IoT Apps
Security is a top priority when it comes to IoT apps. Since your Raspberry Pi remote control IoT app will be controlling devices in your home, it's essential to implement strong security measures to protect against unauthorized access.
Security Tips
- Use strong passwords and enable two-factor authentication.
- Keep your software and firmware up to date.
- Limit access to your Raspberry Pi by configuring firewalls.
By following these tips, you can ensure your IoT app is secure and your devices are protected from potential threats.
Expanding Your IoT System
Once you've successfully created your Raspberry Pi remote control IoT app, the next step is to expand your IoT system. This could involve adding more devices, integrating with third-party services, or even creating a custom dashboard for monitoring and control.
Ideas for Expansion
- Add smart lighting systems.
- Integrate with weather APIs for environmental monitoring.
- Create voice-controlled interfaces using services like Google Assistant.
The possibilities for expanding your IoT system are virtually limitless. With a little creativity and some coding skills, you can turn your Raspberry Pi into the ultimate smart home hub.
Conclusion and Next Steps
In conclusion, creating a Raspberry Pi remote control IoT app is a fantastic way to take control of your smart home devices. From setting up the hardware to coding the app, every step offers a unique learning experience. By following the guidelines in this guide, you can build a powerful and secure IoT system that meets your needs.
So, what are you waiting for? Grab your Raspberry Pi and start building your dream IoT app today! Don't forget to share your experience and creations with the community. Who knows, you might just inspire someone else to embark on their own IoT journey.
Remember, the world of IoT is evolving rapidly, and staying updated with the latest trends and technologies is key to success. Keep experimenting, keep learning, and most importantly, have fun!