Hey there, tech enthusiasts! If you're reading this, chances are you're either a proud owner of a Raspberry Pi or someone who's been hearing all the buzz about it. Let's dive straight into the heart of the matter: raspberry pi remote access free. Imagine being able to control your Raspberry Pi from anywhere in the world without breaking the bank. Sounds awesome, right? Well, buckle up because we're about to explore how you can achieve this magic trick without spending a dime.
In today's fast-paced world, remote access is not just a luxury—it's a necessity. Whether you're a developer working on a project, a student managing a home lab, or just someone who loves tinkering with gadgets, having remote access to your Raspberry Pi can be a game-changer. The best part? You don't need to invest in expensive software or subscriptions to make it happen.
Before we dive deeper, let me tell you something cool: Raspberry Pi is not just a tiny computer; it's a gateway to endless possibilities. With the right tools and a bit of know-how, you can turn it into a powerhouse for remote access, automation, and so much more. So, let's get started and unlock the secrets of free remote access for your Raspberry Pi!
Read also:Hentai Custom Udon A Unique Culinary Experience Thats Gaining Popularity
Table of Contents
Free Options for Raspberry Pi Remote Access
Security Tips for Remote Access
Read also:How To Become A Famous Person The Ultimate Guide To Building A Celebritylike Presence
Best Practices for Efficient Remote Access
What is Raspberry Pi?
Alright, let's start with the basics. For those who are new to the world of Raspberry Pi, here's a quick rundown. Raspberry Pi is a credit-card-sized computer that plugs into your TV or monitor and uses a standard keyboard and mouse. It's a versatile little device that can be used for a variety of projects, from media centers to home automation systems.
Now, when it comes to raspberry pi remote access free, the possibilities are endless. You can use it to monitor security cameras, control smart home devices, or even run a web server—all from the comfort of your couch or from anywhere in the world.
Key Features of Raspberry Pi
- Compact and affordable design
- Supports a wide range of operating systems
- Perfect for hobbyists and professionals alike
- Compatible with numerous accessories and add-ons
Why Remote Access Matters
Remote access isn't just about convenience; it's about efficiency and flexibility. Imagine being able to troubleshoot a server issue from your phone while you're on vacation or accessing your home files without needing to physically be there. That's the power of remote access.
For Raspberry Pi users, remote access opens up a world of opportunities. You can manage your projects, update software, and even troubleshoot issues without needing to be physically present. And the best part? You can do all of this for free!
Free Options for Raspberry Pi Remote Access
Now, let's talk about the good stuff: free options for remote access. There are several tools and methods you can use to achieve raspberry pi remote access free. Here are a few popular ones:
1. SSH (Secure Shell)
SSH is one of the most popular methods for remote access. It's secure, reliable, and best of all, it's free. With SSH, you can connect to your Raspberry Pi from any device with an internet connection.
2. VNC (Virtual Network Computing)
VNC allows you to remotely control the graphical interface of your Raspberry Pi. It's perfect if you need to interact with the desktop environment rather than just running commands.
3. Web-Based Solutions
There are several web-based tools that allow you to access your Raspberry Pi through a browser. These tools are easy to set up and don't require any additional software on your client device.
Setting Up Remote Access
Setting up remote access for your Raspberry Pi is easier than you might think. Here's a step-by-step guide to help you get started:
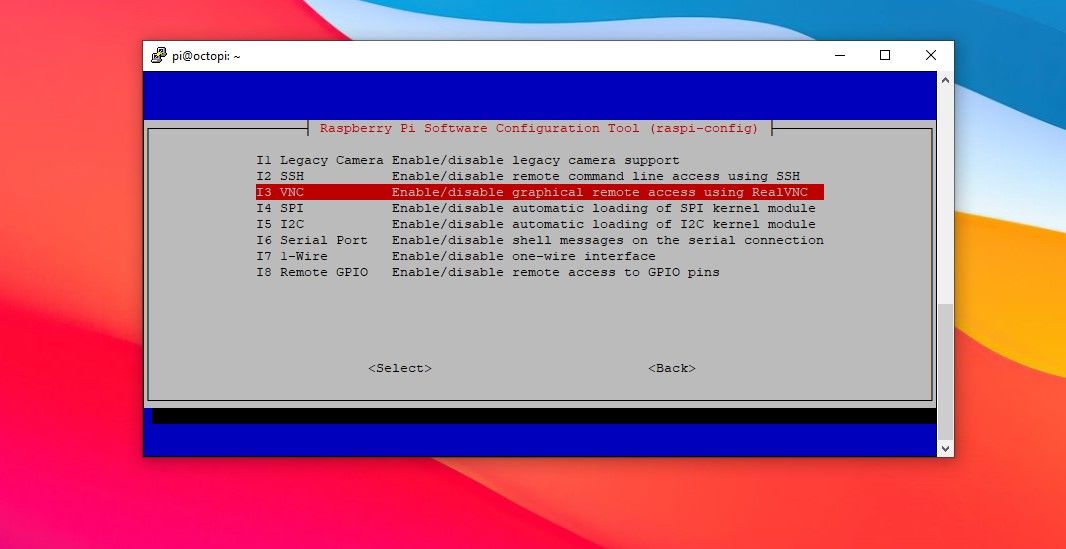
Step 1: Enable SSH
To enable SSH on your Raspberry Pi, simply open the terminal and type the following command:
sudo raspi-config
Navigate to the "Interfacing Options" and enable SSH. That's it! You're now ready to connect remotely using SSH.
Step 2: Set Up a Static IP
Having a static IP address makes it easier to connect to your Raspberry Pi from outside your network. You can set this up in your router's settings or by configuring it directly on your Pi.
Step 3: Configure Port Forwarding
To access your Raspberry Pi from outside your local network, you'll need to set up port forwarding on your router. This allows external devices to connect to your Pi through your router.
Security Tips for Remote Access
While remote access is incredibly useful, it's important to prioritize security. Here are a few tips to keep your Raspberry Pi safe:
- Use strong, unique passwords
- Enable two-factor authentication if possible
- Keep your software and firmware up to date
- Limit access to trusted IP addresses
Common Issues and Solutions
As with any technology, you might encounter a few hiccups along the way. Here are some common issues and how to solve them:
Issue 1: Unable to Connect
Solution: Check your IP address and ensure that port forwarding is correctly set up on your router.
Issue 2: Slow Connection
Solution: Optimize your network settings and consider using a wired connection instead of Wi-Fi for better performance.
Best Practices for Efficient Remote Access
To make the most out of your raspberry pi remote access free setup, here are a few best practices:
- Regularly back up your data
- Use a reliable power source for your Pi
- Monitor your system's performance and usage
- Document your setup process for future reference
Exploring Advanced Features
Once you've mastered the basics, you can start exploring more advanced features. For example, you can set up a VPN (Virtual Private Network) to enhance security or use cloud-based services to access your Pi from anywhere.
Another exciting feature is automation. You can use scripts and cron jobs to automate tasks, making your remote access experience even more efficient.
Comparison of Free Tools
Not all tools are created equal, and it's important to choose the one that best suits your needs. Here's a quick comparison of some popular free tools for raspberry pi remote access free:
Tool 1: SSH
Pros: Secure, easy to set up, widely supported
Cons: Command-line only, no graphical interface
Tool 2: VNC
Pros: Full graphical access, user-friendly
Cons: Can be slower than SSH
Tool 3: Web-Based Solutions
Pros: No additional software required, accessible from any device
Cons: May have limitations compared to native tools
Final Thoughts
There you have it, folks! A comprehensive guide to raspberry pi remote access free. Whether you're a seasoned pro or a complete beginner, there's something here for everyone. By following the steps outlined in this article, you can unlock the full potential of your Raspberry Pi and take your projects to the next level.
So, what are you waiting for? Grab your Raspberry Pi, roll up your sleeves, and start exploring the world of remote access. And don't forget to share your experiences in the comments below. Who knows? You might just inspire someone else to embark on their own Raspberry Pi adventure!